Here is a tutorial to learn how to draw this horrible daemon (in Manga / Anime style).

 Our first daemon is here !
Ryuk is a deamon from the Death Note manga.
He’s the god of death, he is particularly curious and hates to be bored, which often leads him to visit humans. He is quite insightful and very joking.
Let’s begin this tutorial, thanks to it you will be able to draw a horrible demon to scare your friends !
Step 1
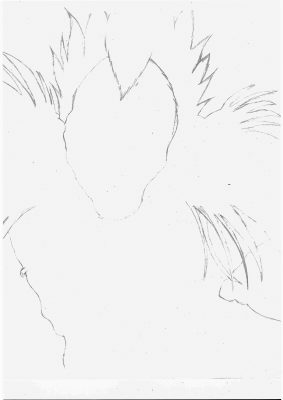 First of all you have to make a preparatory sketch with only the main lines of the character, with a wooden pencil.
If possible use a 2H pencil, otherwise a HB one, that will not change your drawing.
Caution : Your pencil must be carving … when drawing the lines, be careful not to press too hard ! Don’t forget you will have to erase this preparatory drawing at the end of your work.
Start to draw the contour of the face, the main shape of the hair, and the chest.
Step 2
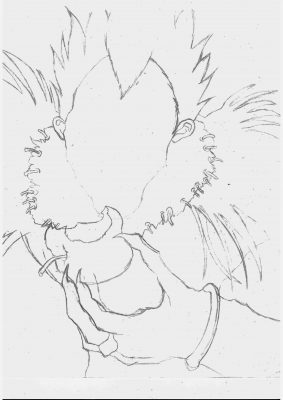 After having drawn the main lines of the drawing, you can start to draw the details.
I advise you to draw the ears, then the hand that holds the apple.
With these first elements, you will have guidelines that will allow you to draw the clothes in the right proportions.
Step 3
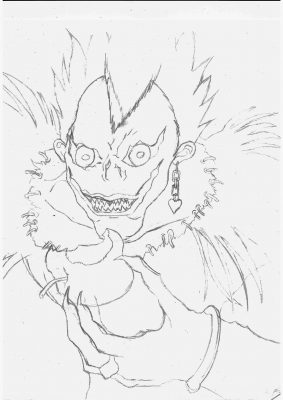 You’re on the right track, the most difficult is yet to begin, but don’t be discouraged !
Now it gets a bit complicated if you are not especially comfortable with the drawing of the faces. You have to draw the eyes, the nose, the mouth as well as the small earring that it carries. Start with the earring this is the simplest !
Then continue with the eyes. To help you, think that between it, you should have enough room to place a third eye … you can draw it if it helps you, but do not press too hard on your pencil (will have to erase it).
You have already done the most complicated, congratulations !
All you have to do now is the deamon’s nose and his mouth.
All you have to do now is the very skeletal nose and the mouth full of little demonic teeth.
Use the contours of the face and eyes to place it where it has to be.
Step 4
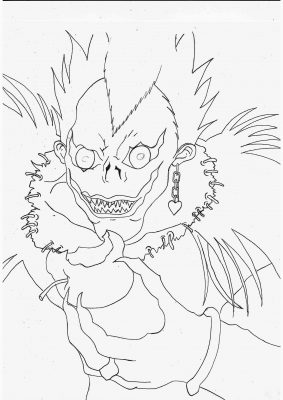 This step is easier. You will need for it to have a black pen with fine tip, to draw over the lines of wooden pencil.
After doing this, you just have to erase the pencil strokes underneath, with a good rubber.
Step 5
 The last step will take a little more time than the others, you will have to use wooden pencils B2, B3, B6 and of course a HB one.
Start with the darkest zones of your design and fill the area with your B6 pencil. It’s the darkest shade so use it the for the hands and the garment.
Then take your B3 and your HB pencil and draw the small shading effects. For the hair use the B2 pencil, it will be necessary to vary the pressure to succeed in creating realistic shades in the hair.
To finish, with a handkerchief or simply with your fingers, spread the pencil over the entire surface of the drawing and if necessary enhance some lines that seems too clear to you with the HB pencil.
You’ve finished!
Well done !

 forming a perfectly symmetrical composition.
The eyes are penetrating, and the muzzle is emphasized by decorative lines and patterns.")


. He also appears in a movie with Jim Carrey (2000), and in computer-animated Christmas film produced by Illumination (2008).")


. A woman with classical features, draped in antique attire and crowned with flowers, walks barefoot while holding the hand of a little girl who looks up at her. Three winged cherubs hover above them (one leaning on her shoulder, another holding a bow), while a path lined with trees, flowers, and hills opens into the distance.
The composition recalls allegorical literary illustrations of the 19th century, particularly those associated with John Milton's L'Allegro.")
. An imposing theater mask with a stern face, round eyes, curved fangs, and leafy ornaments around the temples. A tall headdress with repetitive decoration, made of papier-mâché, painted and adorned with small mirrors, worn by the actor portraying Thotsakan in the masked dances of the Ramakien (a tradition linked to the Ayutthaya period).")
. Knights in chainmail and cross banners assault walls using ladders, a siege tower, and a battering ram. Likely scene of the capture of Jerusalem in 1099 (First Crusade, 11th century), with domed buildings visible behind the ramparts and soldiers stationed on the towers.")
. Workers in traditional attire set up formwork, tamp the earth, and place stones to raise the rampart. A cart pulled by an ox is visible, along with men carrying baskets of materials and leveling instruments, while the wall and its towers snake across the mountain ridges in the background.")

. Four researchers in lab coats examine a sheep in a stall, using a microscope, flasks, and a chart displaying embryonic stages. Dolly, the first mammal cloned from an adult somatic cell, was born on July 5, 1996, at the Roslin Institute near Edinburgh, Scotland; the public announcement was made in 1997, and the technique used was somatic cell nuclear transfer.
The scene also includes a window overlooking the countryside and scientific diagrams hung on the wall.")